
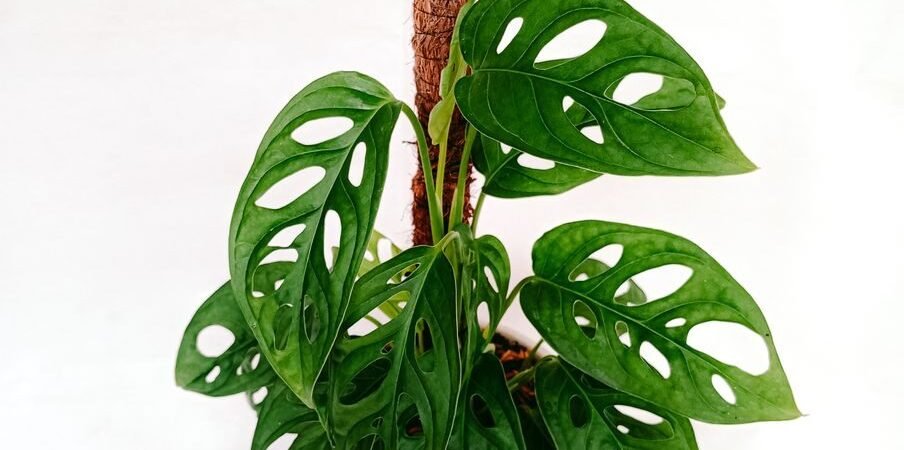
In the wild, a monstera deliciosa climbs. It sends thick aerial roots into the bark of a tree and hauls itself upward, leaf by leaf, toward brighter light — which is exactly why the leaves get bigger and more dramatic the higher the plant goes. In your living room there is no tree, so most monsteras do the next best thing: they lean, sprawl, and make smaller leaves than they are capable of.
A moss pole is the stand-in tree. It gives those aerial roots something moist and grippy to dig into, and once they latch on, the whole plant changes its mind about growing sideways. Installing one takes about fifteen minutes, and it is the single highest-impact upgrade you can make for a leggy monstera — more than fertilizer, more than a new pot.
Quick answer: soak a sphagnum moss pole, push it deep into the pot behind the main stem (the side the aerial roots emerge from), loosely tie the stem — never the leaf stalks — to the pole every 6–8 inches, then keep the moss itself moist. Aerial roots typically grip within 4–8 weeks.
Why a moss pole works (and a plain bamboo stake mostly doesn’t)
A bamboo stake holds the plant up. A moss pole holds the plant up and feeds its aerial roots. That distinction matters, because an aerial root that finds moist moss does something a tied-to-a-stick root never does: it anchors, it absorbs water, and it sends the plant the “climbing” signal that triggers bigger, more fenestrated leaves. If you have been wondering why your monstera’s leaves are not splitting, a moss pole is very often the missing piece.
The pole also solves the flop. A mature monstera is top-heavy by design, and gravity turns an unsupported one into a sideways sprawl with stems snapping at the base. Before you assume your plant is dying, check whether it is simply unsupported and drooping — a pole fixes that in one sitting.
Pick the right pole: sphagnum vs. coco coir
Walk into any garden center and you will find poles labeled “moss pole” that are actually coco coir — a brown fibrous sheet wrapped around a stick. Both work, but they are not equal. Here is the honest comparison:
| Pole type | Holds moisture | Aerial roots grip it | Notes |
|---|---|---|---|
| Sphagnum moss pole (plastic or wire mesh core filled with moss) | Excellent | Excellent | The gold standard. Roots grow into the moss. Costs more, worth it. |
| Coco coir pole (fiber sheet around a stake) | Moderate | Moderate | Cheaper and everywhere. Roots grip the fiber surface but rarely penetrate it. |
| DIY PVC + sphagnum pole | Excellent | Excellent | Cheapest per inch for tall poles; see the DIY section below. |
| Plain bamboo/wooden stake | None | Poor | Support only. Fine for a young plant, outgrown fast. |
If you buy one thing, buy a stackable sphagnum pole — the kind where sections slide or screw together. Monstera grows fast once it is happy, and a fixed-height pole becomes too short within a year. Stackable poles let you add six more inches instead of starting over.
How tall should the pole be?
Buy for the plant you will have in a year, not the plant you have today. A good rule: the pole should stand at least as tall as the plant plus 6–12 inches of headroom above the top leaf. About 4–6 inches of the pole disappears into the soil for stability, so a pole that looks generous on the shelf gets shorter the moment you plant it.
Undersized poles are the most common purchase mistake. The plant reaches the top in months, the growth tip flops over the end, and you are re-potting the whole thing to swap the pole — exactly the root disturbance you want to avoid. One tall stackable pole beats two short ones bought a year apart.
How to install a moss pole in 9 steps
Best-case timing: do this during a repot, when you can place the pole without stabbing through the root ball. If the plant is not due for a repot, you can still install one — just work gently. The full step-by-step repotting guide pairs well with this job.
- Soak the pole. Submerge a sphagnum pole (or the moss portion) in room-temperature water for 15–30 minutes. Dry moss is hydrophobic — it will shed water instead of absorbing it until it is fully saturated.
- Find the back of the stem. Look at your monstera’s main stem: aerial roots emerge from one side, and the leaves reach away from the other. The pole goes behind the stem, on the aerial-root side — that is where roots will grab it. This is the single most common placement mistake; a pole in front of the plant looks fine and does nothing.
- Push the pole deep. Sink it 4–6 inches into the potting mix, as close to the main stem as you can without forcing it through thick roots. It should stand firm on its own before you tie anything.
- Point the aerial roots at the pole. Gently guide any long aerial roots toward the moss. Do not cut them first — they are the whole point. If a root is too stiff to bend without snapping, leave it; new roots will find the pole.
- Tie the stem, never the leaf stalks. The thick main stem gets tied to the pole. The leaf stalks (petioles) must stay free — they swivel to face the light, and pinning them breaks that mechanism and can rot the joint.
- Space ties every 6–8 inches. Use soft plant ties, velcro garden tape, or strips of old t-shirt. Start low and work up, keeping the stem snug against the pole.
- Keep every tie loose. You should be able to slide a finger under each tie. Tight ties girdle the stem as it thickens — check them monthly and loosen or move them as the plant grows.
- Water the soil on its normal schedule. The pole does not change how you water the pot. If you are unsure what “normal” looks like, the overwatered vs. underwatered guide keeps you honest — a wet pole is no excuse for soggy soil.
- Settle it in bright, indirect light and leave it alone. Do not keep re-tying or repositioning the plant. Stability is what lets aerial roots commit; a plant that gets fiddled with every week stays unattached.
The step everyone skips: keep the moss itself moist
Here is why half of all moss poles “do not work”: the moss dries out in two days, and an aerial root will not grip dry bark any more than it will grip dry plastic. The pole has to stay damp — not dripping, just consistently moist like a wrung-out sponge — for roots to grow into it.
The laziest reliable method: mist the pole every 1–2 days, or pour a cup of water slowly down the top of the pole once a week so it soaks through. For tall poles, the classic trick is a funnel at the top — a plastic bottle with the bottom cut off, inverted into the pole’s hollow core, filled like a little reservoir that drains down through the moss. Whatever method you pick, check the middle of the pole, not just the top: the top can feel damp while the center is bone dry.
Signs it is working: within 4–8 weeks you will see pale root tips flattening against the moss and fine root hairs gripping it. When you can give the stem a gentle tug and the pole moves with it, the plant has adopted its tree.
5 mistakes that keep aerial roots from ever attaching
| Mistake | Why it fails | The fix |
|---|---|---|
| Pole placed in front of the plant | Aerial roots emerge from the back of the stem and never reach it | Reposition the pole behind the stem, root-side in |
| Moss left bone dry | Roots will not grip or grow into dry moss | Mist every 1–2 days or use the bottle-funnel reservoir |
| Tying the leaf stalks (petioles) | Restricts movement, rots the joint, stresses the plant | Untie and re-tie only the thick main stem, loosely |
| Ties cinched tight | Girdles the stem as it thickens; can strangle growth | Loosen so a finger fits underneath; check monthly |
| Pole too short | Growth tip reaches the top in months and flops over | Start with headroom, or buy a stackable pole and extend it |
When your monstera outgrows the pole
It will happen, and it is a good sign. With a stackable pole, you simply add another section on top, tie the new growth in, and keep going. With a fixed pole, your options are: extend it with a second pole lashed alongside (works, looks rustic), or re-pole during the next repot with a taller one.
What about the old pole, completely wrapped in roots? Do not rip the plant off it — tearing rooted aerial roots sets the plant back hard. Either extend above it and let the lower section stay as the established base, or, if you must separate them, soak the pole thoroughly first and peel the roots away slowly. A repot into fresh chunky aroid mix at the same time gives the plant the best recovery conditions.
Can you make your own moss pole?
Yes, and for tall poles it is the cheapest route. The simplest version: take a length of PVC pipe or a sturdy wooden dowel, wrap damp sphagnum moss around it in a thick layer, and bind it with fishing line or garden twine in a spiral. Cap the bottom so moss does not fall out. The mesh-bag version — sphagnum stuffed into a tube of plastic garden mesh — holds more moss and stays moist longer, but takes more fiddling. Either way, soak the finished pole before installing, exactly like a store-bought one.
Related rescues
- How to Repot a Monstera in 9 Steps (With Moss Pole Tips)
- Best Soil Mix for Monstera: A Simple DIY Recipe
- Why Are My Monstera Leaves Not Splitting? 6 Causes & Fixes
Do monsteras actually need a moss pole?
Need is a strong word — a monstera will survive without one. But without support it grows sideways, stays smaller, and produces fewer fenestrations, because in nature it only makes its biggest leaves once it starts climbing. If you want a tall, dramatic plant instead of a sprawling one, a moss pole is the closest thing to a requirement.
Should the moss pole go in front of or behind the plant?
Behind — on the side of the main stem where the aerial roots emerge. The leaves reach away from the root side, so if your monstera’s leaves face the window, the pole typically goes on the room-facing back of the stem. A pole placed in front of the plant looks tidy and accomplishes nothing.
Can I use a bamboo stake instead of a moss pole?
For a young monstera, yes — it provides basic support. But aerial roots cannot grip or absorb from dry bamboo, so the plant gets none of the climbing benefits: no root anchoring, no extra moisture, and usually smaller, less-split leaves. Think of a stake as a crutch and a moss pole as an upgrade.
How long until the aerial roots attach to the pole?
Usually 4–8 weeks if the moss stays consistently moist. Dry moss is the number one reason roots never attach — they will not grip a dry surface. Mist the pole every 1–2 days or use the bottle-funnel reservoir trick, and check the middle of the pole, not just the top.
Will the moss pole cause mold or rot?
A damp pole in a well-ventilated room is fine; a perpetually soggy pole in still air can grow surface mold. The fix is airflow and moderation: keep the moss like a wrung-out sponge, not dripping, and do not let water pool at the base. If white fuzz appears, let the pole dry out a day and improve air circulation — it is cosmetic, not a plant emergency.