
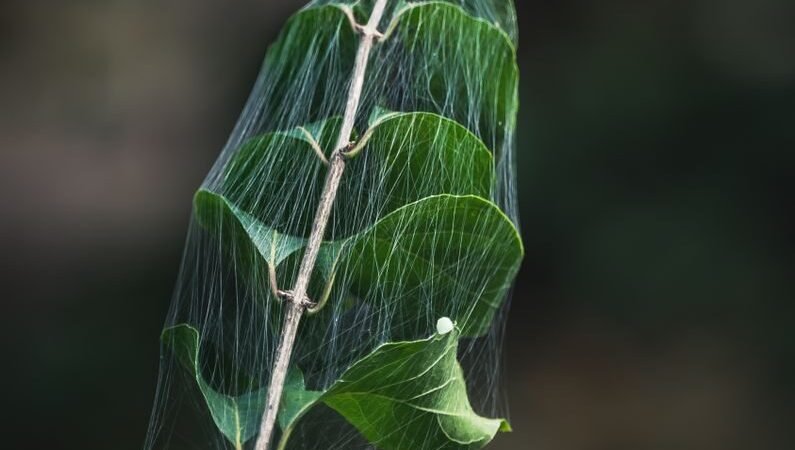
Quick diagnosis: Fine silk webs on your houseplant leaves almost always mean spider mites — not a real spider. Webs show up when the infestation is already heavy: the mites have been feeding on the undersides of the leaves for weeks. Isolate the plant right now, rinse the leaves, and run the 60-second white-paper test below to confirm before you spray anything.
You walk over to water your monstera, and there it is: delicate silk stretched between the leaves, like a tiny spider moved in overnight. Your first instinct is probably to look for the spider. Don’t bother — the odds are overwhelmingly against a real spider being the culprit. A real spider builds one web, sits in it, and leaves your plant alone. The fine, messy silk draped across your leaves is the work of spider mites, and it means the infestation is further along than it looks.
The good news: this is fixable, and the webs themselves are a gift — they make a pest that is nearly invisible to the naked eye easy to spot. Here’s how to read what you’re seeing, confirm it in about a minute, and get the plant back on track.
What Do the Webs Mean?
Spider mites are tiny arachnids — relatives of spiders and ticks — about 0.02 inches long, small enough to miss even on a badly infested leaf. The most common indoor species is the two-spotted spider mite. They live in colonies on the undersides of leaves, pierce individual plant cells, and suck out the contents. As the colony grows, the mites spin fine silk webbing to shelter themselves and their eggs.
That last part matters: webbing is a late sign. Early spider-mite damage looks like nothing more than tiny pale dots — stippling — on the upper leaf surface. By the time you can see silk, the mites have usually been feeding for two or three weeks, and the population is large enough to need a real treatment plan, not just a rinse. According to the University of California IPM houseplant guide, spider-mite feeding first shows up as a stippling of light dots, leaves can turn bronze or yellow as feeding continues, and webbing may be noted near growing points.
Spider mites love exactly the conditions your home provides in late fall and winter: warm, dry, dusty air and plants that are a little thirsty between waterings. Heated rooms in November are peak spider-mite season, which is why the webs often appear right around now.
The 60-Second Triage: 3 Checks
Before you treat anything, confirm what you’re dealing with. Three quick checks tell you almost everything:
- Look under the leaves. Turn over a webbed leaf and look at the underside, especially along the veins and near the stem. Spider mites cluster there. With a bright light — or a 10x hand lens if you have one — you may see tiny moving dots, round translucent eggs, and pale cast skins the mites have shed.
- Check for stippling. Hold a leaf up to the light. Dozens of tiny pale or yellow dots, like the leaf was pricked with a fine needle, are the feeding marks. A leaf that looks dull, dusty, or washed-out from a distance is usually covered in stippling up close. Stippling plus webs is a near-certain spider-mite diagnosis.
- Do the white-paper test. Hold a sheet of white paper under a suspect leaf and tap the leaf sharply. If tiny specks fall onto the paper and start moving, those are mites. (Full steps below.)
If all three checks point the same way, you have your answer — skip the guesswork and start the first-10-minutes plan below.
Spider Mites or a Real Spider?
This is the question everyone asks first, and it’s worth answering properly, because the two need opposite responses: a real spider is a helpful houseguest, and spider mites are a plant emergency.
| Clue | Real spider | Spider mites |
|---|---|---|
| The web | One neat web, usually in a corner or between a stem and a wall | Fine, messy silk draped across many leaves, leaf joints, and stem tips |
| The spider | Visible — a single spider sitting in or near the web | No spider in sight; the mites are about 0.02 inches and hide under leaves |
| Leaf damage | None — a real spider doesn’t eat plants | Pale stippling, dull or bronzed leaves, leaves yellowing and dropping |
| Moving dots | No | Yes — tap a leaf over white paper and watch for moving specks |
| What to do | Leave it, or gently relocate it — it eats pests | Isolate the plant and start treatment (see below) |
One more tell: real spiders rarely set up on a plant at all — they prefer a quiet corner. If the silk is wrapped around the plant itself, it is almost certainly mites.
What Else Could It Be?
Webs narrow the field a lot, but a few other things get mistaken for spider-mite silk. Run through this table before you commit to a treatment:
| What you see | What it probably is | How to tell |
|---|---|---|
| Fine silk + stippled, dull leaves | Spider mites | White-paper test shows moving specks; damage on leaf undersides |
| White cottony clumps where leaves meet the stem | Mealybugs | Fluffy, waxy clusters, often with sticky honeydew — see our mealybug guide |
| Silvery streaks + tiny black specks, no webs | Thrips | Scraped-looking patches and shiny black droppings — see our thrips guide |
| Loose cobwebby strands, no leaf damage | Dust or a passing spider | Wipe it away; if the leaves underneath are healthy and nothing returns in a week, it was nothing |
| White fuzz on the soil surface | Soil mold | On the soil, not the leaves — see our tiny white bugs guide for soil-dwellers |
If the leaves are also sticky, you may be looking at a second pest on top of the mites — honeydew from mealybugs, aphids, or scale. Our sticky leaves guide walks through that one.
Confirm It: The White-Paper Test
This is the test every extension service recommends, and it takes about a minute. Do it before you spray anything — stippling can linger on leaves long after mites are gone, so damage alone isn’t proof of an active infestation.
- Take a plain sheet of white paper and hold it flat under a webbed or stippled leaf.
- Tap or shake the leaf sharply, two or three times.
- Look closely at the paper. Tiny specks like dust or pepper that start moving on their own are spider mites — the Missouri Botanical Garden describes exactly this check.
- For extra certainty, press a speck with your fingertip: a reddish-brown smear is another classic sign.
- Repeat on two or three leaves, including one that looks healthy — mites spread before damage shows.
Moving specks plus webs plus stippling is a confirmed diagnosis. No moving specks after two tries on different leaves? The mites may be gone and the webs old — keep the plant isolated and re-check in a few days before treating.
What to Do in the First 10 Minutes
- Isolate the plant. Move it away from your other plants so no leaves touch. Mites crawl from plant to plant, and they can ride on your hands and clothes too — wash your hands after handling it.
- Inspect the neighbors. Check the plants that stood closest, especially leaf undersides and new growth. If you find webs or stippling on a second plant, isolate that one too.
- Rinse the plant. A firm spray of lukewarm water — in the shower or sink, pot tilted so the soil stays put — knocks mites, eggs, and webs off the leaves. Aim at the undersides, where the mites live. Let it drain fully before it goes back on its shelf.
- Wipe big leaves. For sturdy, smooth leaves (like a monstera), follow the rinse with a soft damp cloth on the undersides, supporting each leaf from below. Skip this on fuzzy or delicate leaves — you’ll do more harm than good.
- Prune the worst leaves. If a few leaves are densely webbed and badly bronzed, cut them off and bag them — don’t leave them on the soil or beside the plant. Only prune what the plant can spare.
- Don’t spray yet. One rinse is not a treatment, but it’s the right first move. Confirm the pest (above), then follow the plan below. Spraying the wrong product at the wrong pest wastes a week.
The Treatment Plan in Brief
Webs mean a heavy infestation, so plan on several weeks of follow-up, not a single heroic spray. The full step-by-step plan — rinse schedule, insecticidal soap and horticultural oil, when neem helps, and the mistakes that make mites worse — is in our dedicated spider-mite treatment guide. The short version:
- Repeat the rinse every few days for the first two weeks, always hitting the leaf undersides. Water alone knocks numbers down a lot on small plants.
- Use a labeled insecticidal soap or horticultural oil if rinsing isn’t enough, with complete coverage of the leaf undersides — these work on contact, so a light mist on top does nothing. Follow the label exactly, and test one leaf first.
- Repeat on a 5–7 day cycle for 3–4 weeks. Spider mites go from egg to adult in about two weeks at 75°F, so eggs that survive the first round hatch into a fresh wave. Stopping after one good-looking week is the most common reason they “come back.”
- Don’t reach for a broad-spectrum insecticide. UC IPM warns that some general bug sprays kill the predators that eat mites and can trigger a worse outbreak — and many don’t control mites at all.
- Fix the conditions too. Mites thrive on hot, dry, dusty, thirsty plants. Keep the soil check honest — our overwatered vs underwatered guide shows how — and wipe dusty leaves so you can actually see new damage early.
Recovery Timeline: What to Expect
Damaged leaves never heal — stippling is permanent. Recovery means new growth comes in clean and the mite count falls to zero. Here’s a realistic schedule:
| When | What to do | What you should see |
|---|---|---|
| Day 1 | Isolate, rinse, prune the worst leaves, confirm with the paper test | Webs gone after rinsing; mites still present on close inspection |
| Day 4 | Re-check undersides and neighbors; rinse again | Fewer moving mites; no fresh webs if the rinse worked |
| Day 7 | Apply a labeled soap or oil if mites remain, per the label | Stippling stops spreading to new leaves |
| Day 14 | Full inspection; repeat the treatment cycle while any active mites remain | New growth looks clean; old damage stays but doesn’t spread |
| Day 21 | Final close inspection of the plant and its neighbors | No moving mites on the paper test for two checks in a row — the plant can rejoin the collection |
If you still find active mites at day 21, keep going with the label-directed cycle — but also re-read the “when to give up” section below. Some battles aren’t worth the shelf space.
When to Give Up
Most webbed plants are worth saving — spider mites are beatable. But be honest with yourself if:
- Most of the leaves are bronzed, webbed, and dropping, with almost no healthy foliage left.
- Mites keep returning after three or four careful rounds of treatment.
- You can’t isolate the plant, and it’s threatening a larger or more valuable collection.
- The plant was cheap and replaceable, and the treatment is costing you more weekends than the plant is worth.
If you do let a plant go, bag it before carrying it through the house, wipe down the shelf and nearby pots, and check the neighbors weekly for the next month. And if a few clean stems remain, take cuttings from healthy growth, rinse them well, and root them in isolation — a fresh start is often easier than a rescue. UC IPM’s own advice is blunt on this point: a persistent or worsening mite problem may be best solved by discarding the plant to stop the spread.
How to Keep the Webs From Coming Back
- Quarantine new plants for two to four weeks and inspect leaf undersides before they join the collection — most infestations arrive on a new plant.
- Check undersides weekly in winter, when warm, dry heated air favors mites. A quick look during watering is enough.
- Keep leaves clean. Dust hides stippling and webs, so a monthly wipe keeps early damage visible.
- Water on the soil check, not the calendar. Thirsty plants are mite magnets — our overwatered vs underwatered guide shows how to read the soil.
- Don’t rely on misting to prevent mites. A light mist raises humidity for only minutes. If your air is very dry, our humidity guide covers methods that actually work.
Related rescues
- How to Get Rid of Spider Mites on Houseplants — the full treatment plan
- How to Get Rid of Thrips on Houseplants — when the damage is silvery streaks, not webs
- How to Get Rid of Mealybugs on Houseplants — when the white stuff is cottony, not silky
Are the webs on my houseplant from a real spider?
Almost certainly not. A real spider builds one neat web, sits in it, and doesn’t damage leaves. Fine, messy silk draped across many leaves and leaf joints — especially with pale speckling on the leaves — is the work of spider mites, which spin silk to shelter their colonies. If you can see a spider in the web and the leaves are healthy, leave it alone; it eats pests.
Can spider mites spread to my other plants?
Yes. They crawl from plant to plant where leaves touch, and they can ride on your hands and clothes. Isolate the webbed plant immediately and inspect its neighbors — especially leaf undersides and new growth — before you treat anything.
Will washing the webs off fix the problem?
Washing helps but doesn’t finish the job. A firm rinse removes many mites, eggs, and webs, but eggs hidden on leaf undersides survive and hatch within about two weeks at room temperature. Expect to rinse and check again every few days for three to four weeks, and use a labeled insecticidal soap or horticultural oil if rinsing alone isn’t enough.
How long does it take to get rid of spider mites?
Plan on three to four weeks. Spider mites go from egg to adult in about two weeks at 75°F, so a single treatment never catches every life stage. Repeat your rinse or labeled spray on a 5–7 day cycle, and only call it done after two clean white-paper tests in a row, several days apart.
Are spider mites dangerous to people or pets?
No — spider mites feed only on plants and don’t bite people or pets. The safety question is the product you use to treat them: follow the label, keep pets away until leaves dry, and prefer insecticidal soap or horticultural oil over broad-spectrum sprays.